Wednesday, November 27, 2013

Leopard Print Nails

After take a few shots at cheetah/leopard print nails, I finally got it.

Once you get the hang of these and find what method works for you, they're a piece of cake to do! They look hard, but in reality, they aren't. After a few tries, it doesn't take very long.

First, find the colors you like. You can use a white background and do pink or colored prints, or you can do classic colors. I like to use a shimmery gold background with brown and black spots.

Once you have your base color, take a dotting tool or bobby pin and make splotches or dots of brown (or the color of your choice) where you want them. They don't have to be perfect. Once you have splotches of brown on all of you nails, take a smaller dotting tool or tooth pick and start putting black around the brown. On some of the spots you can make a C shape, on others you can make a ( ) shape. Once you're satisfied with your spots, add some small black spots in areas where you have the room. This will make them look more realistic.

If the way I tried to explain it isn't that clear, cutepolish has a really good tutorial for how to make the spots. http://www.youtube.com/watch?v=Dg6_atTygco

Dots, Dots, Dots!

Polka dots are one of the easiest things to do on your nails. If you don't have any dotting tools, you can just use a bobby pin. But dotting tools with different sized tips seem to work out better for me than a bobby pin. Dotting tools make life a lot easier. You can find them online or at a local beauty store. They're really cheap, so it's totally worth it to make the investment.


You can do virtually anything with dots. The first ones I did were with a nude base, and fall colored dots. The second ones I did were with two different shades of green and white. You can do so many variations with dots, so get creative!

Thursday, August 1, 2013

Past Designs

Here are some of the past designs I've done.

 SIMPLE RED WHITE & BLUE


 PINK CHEETAH PRINT
One of the more advanced designs I tried. It takes a lot of time and a lot of patience.
 DOTS, DOTS, & MORE DOTS!
(Tip: use a bobby pin to make dots!)
 TUXEDO NAILS
Kinda messy the first time I tried.
 SNOWFLAKE NAILS
 
CANDY CANE NAILS

Jonas Brothers Nails

So, a lot of fans have been excited about this and want to wear this design for their shows this summer. I've been asked a lot of questions about how to do this design, so here's all the details!

You are going to need:
WHITE NAIL POLISH
CLEAR TOP COAT
COTTON BALLS
RUBBING ALCOHOL
A SMALL BOWL
PRINTED OUT JB LOGOS

1. First, go on your computer and flip the Jonas logo backwards so that it shows up normal on your nail. I just copy and pasted the logos onto a Microsoft word document and eyeballed the sizes and made the ones for my thumbs a little bigger. If you do your big toes, make it a little bigger than your thumbs.

2. Print out your sheet of Jonas logos and see what fits your fingers. If you have to resize them, go back and print them again. Once you find a size that works for you, I suggest saving it on your computer in case you want to do it again.

3. Paint your nails white. Use two coats until it is solid. Wait for your nails to COMPLETELY DRY before doing anything else.

4. Fill a small bowl with rubbing alcohol and cut out the Jonas logos you are going to use.
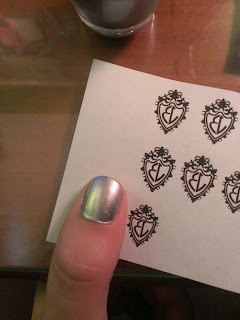
5. Once your nails are completely dry, dip one finger into the alcohol and hold it for around 30 seconds. It probably depends on what nail polish you have and how strong your alcohol is, so you kind of have to play with this step and figure out what works. It may take a few tries.

6. Pull your finger out of the alcohol and put the paper with the logo with the ink facing down onto your nail and press. Since computer paper is thicker than newspaper, use a cotton ball with alcohol on it to dab more alcohol on top so that it soaks through the paper completely. (Kinda like you do with a temporary tattoo)

7. Now here's the tricky part, knowing how long to press the paper on. Make sure that you evenly press all sides of the logo onto your nail so that the darkness is even. Finding out what works and how long to hold it is up to you. Its hit or miss. You're going to have to try a few times. I did.

8. Once you have the logo on your nail, carefully finish with a top coat. I think top coats also depend because the first time I did it, the top coat smeared the ink. If that happens, try again with another top coat. These last few steps have to be figured out based on personal preference.

That's the most details I have to give. This design is tricky because it's hit or miss. You have to try a few times to find out what works for you. So don't give up! You'll find a method. It took me 4 or 5 times to get it right!
 
GOOD LUCK JONAS FANS! <3
 

 Leave me comments and questions below, or send them to my twitter.
 
Send me pictures of the nails you guys do!

Wednesday, July 31, 2013

Bob Marley Nails

COLORS USED:
"Snow Me White" by Sinful Colors
"Your Palapa or Mine?" by OPI
"Pull Over" by Sinful Colors
"Fearless" by Revlon
"Colorstay Gel Shine Top Coat" by Revlon
Music notes made with a black striping polish by LA Colors Art Deco

There are two variations of this design.

VARIATION 1:
Apply one thin layer of white polish on your nails so the other colors will be vibrant. Next, ombre the green, yellow, and red onto your nails with a makeup sponge. Continue rolling the sponge over your nails until the colors are solid and you have accomplished the desired effect. You can off set the sponge to cause the colors to blend, or you can keep them looking more like stripes. It all depends on preference. Finish with a top coat and clean off the polish around your fingers.

 VARIATION 2:
Apply one thin layer of white polish so the other colors will be vibrant. Paint the stripes of colors next to each other onto a makeup sponge. Dab the polish onto a piece of paper and only roll the sponge over your nails once to create a faded effect and still see some of the white. Finish by painting music notes on each nail. Finish with a top coat and clean off the polish around your fingers.


This was the first time I've attempted painting on music notes with a striping brush. Hopefully they will come out more neat the next time. Its all about finding the method that works for you. Once you try a design for the first time, you will develop a better and easier method the next time. I'm definitely doing it differently the next time!


Tuesday, July 30, 2013

Tropical Under The Sea Nails

COLORS USED:
"Snow Me White" by Sinful Colors
"Flip Flop" by Urban Outfitters (UO Basics Collection)
"No Room for the Blues" by OPI
"Bikini So Teeny" by Essie
"Colorstay Gel Shine Top Coat" by Revlon

Start with one thin layer of white to help the other colors look more vibrant. Next stripe the aqua, blue, and pastel purple onto a makeup sponge. Roll the sponge over your nail or dab on your nail to create the ombre effect. Continue layering the colors over one another, off setting the colors a little to get them to blend. When you are satisfied with the layering of colors, clean off the skin around your nails and apply a top coat. This adds shine and helps to blend the colors even more.


Welcome!

Hello everyone! Welcome to my blog. I know there are many nail blogs and nail tutorials out there, but I have decided to try out my own. I'm hoping to use this blog as a fun way to document the nail art I attempt on my nails.

I don't have the longest nails, so sometimes nail art can be a challenge. Sometimes I feel like there are limited designs for small or short nails. But have no fear!  I'm going to show you all the simple and creative things that work for short nails.

On this page you can see pictures of the designs I try. Give me suggestions on what you think I should attempt on my nails.